
Ads-B-Gone
This post was originally written in 2020 but the process for adding new clients still works as of December 2025.
I’ve been getting some quite obnoxious ads on my phone of late. In the past, I used Pi-hole, which blocks ads on the network level via DNS. By combining this with OpenVPN I had ad-blocking on my OnePlus 3. Things have moved on since then; the machine – a laptop ‘server’ – serving Pi-hole was decommissioned and I have a different phone.
While Pi-hole was originally designed for Raspberry Pis, it runs great elsewhere. Having a server with Proxmox running, I figured I’d set up Pi-hole in an LXC. OpenVPN has pretty much been superseded by WireGuard, which is now included in the Linux kernel.
So the plan is Pi-hole and a WireGuard endpoint in an LXC for when I have my phone outwith my own network. Let’s get to it!
Useful Reading
- https://florianmuller.com/install-pihole-on-a-proxmox-lxc-ubuntu-container-and-setup-as-primary-dns-for-unifi-network — for setting up Pi-hole on LXC
- http://jodies.de/ipcalc – handy for calculating or double-checking netmasks
- https://nixvsevil.com/posts/wireguard-in-proxmox-lxc/ – for getting the wireguard module running on the PVE host
- https://wiki.archlinux.org/index.php/WireGuard – very useful documentation on WireGuard, not much is exclusively Arch-specific
Pi-Hole on LXC
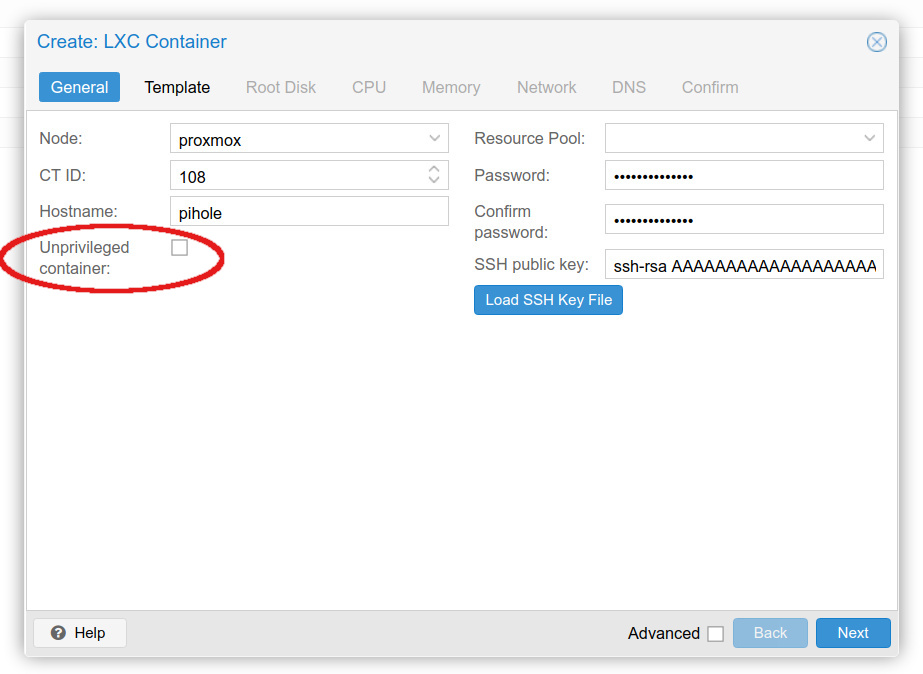
I used Ubuntu 20.04 for the container. The container should be privileged- ie uncheck the ‘unprivileged’ box.
I’ve used the easy setup script for their ‘one-step install’ before, so I did so again:
curl -sSL https://install.pi-hole.net | bash
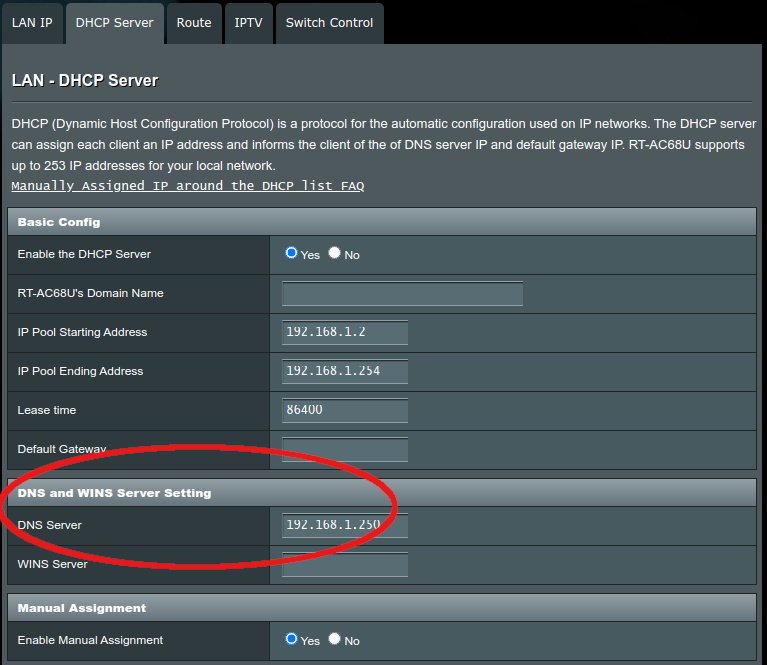
The installer is straightforward. That got me up and running, and then it was a matter of changing the DNS settings on my DHCP server, which is my router.
I’m running an ASUS RT-AC68U, which has its local DNS setting buried under:
LAN ? DHCP Server ? DNS and WINS Server Setting
I also set the upstream DNS server to the Pi-hole, for clients not using DHCP that have the DNS server set manually to the router:
WAN ? Internet Connection ? WAN DNS Setting
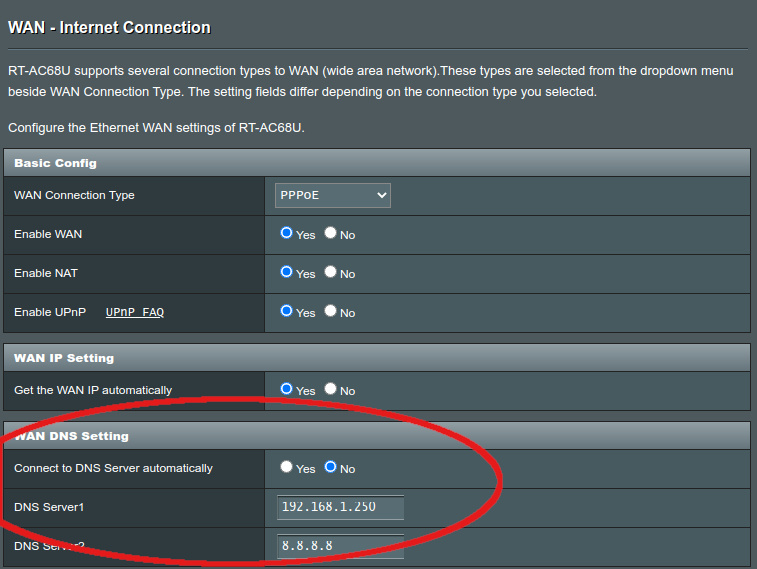
I don’t recall how many clients this will affect, but it’s good to have it there. I have 8.8.8.8 set as an alternative server, which the router should use if the Pi-hole isn’t responding. This is Google’s public DNS, there are alternatives.
That’s enough to get Pi-hole functional for my local network!

Local Network Layout
With Pi-hole set up the next step is to get WireGuard running on both the LXC and my phone. Note that I don’t actually have to have WireGuard running on the same machine/container/node as Pi-hole, but since it is a privileged container anyway I thought I would keep the two together. This kind of breaks separation of responsibilities and ties services together, but since I’m mainly using WireGuard for ad-blocking for my phone I think this is fine for now. In any case, it is trivial to move the WireGuard configuration to another container/node/machine if I deicide I do want to separate them.
Before configuring WireGuard, I decided to expand my local network address space. I am way below the 255 devices that a /24 subnet provides; but between DHCP allocations, one virtual machine server (Xen) and another (Proxmox) we’re nearly at to the top of the address space- at least conceptually.
So I expanded from a /24 to a /22, giving a couple extra subnets. On a practical level, this meant changing netmasks from 255.255.255.0 to 255.255.252.0. Not a huge deal, but it lets me keep WireGuard peers on their own subnet, and have another subnet for ‘other stuff’ in the future- home automation-related equipment, perhaps.
WireGuard on Proxmox PVE Host
WireGuard is pretty straightforward to set up, as long as you have the right things in place and don’t make silly mistakes. I include the common-sense caveat as I tripped up in a couple of places, which I’ll highlight here:
- being a container, LXC shares a kernel with its host, so kernel modules like wireguard need to be managed on the host
- weird connectivity issues, like WireGuard only working in one direction, might indicate a typo in your configuration — double check your addresses!
WireGuard is included in the Linux kernel from 5.6, but the kernel currently running in Proxmox is 5.4; so we need to build the module. If you don’t have them, you should install the kernel headers, which for Proxmox hosts is:
# apt install pve-headers
Note: if you haven’t updated your kernel in a while, the headers package won’t match the running kernel and you won’t be able to build or load the wireguard module. I had to apt upgrade to the latest first.
Fortunately, it’s available in the backports repository, which needs to be enabled:
# echo "deb http://deb.debian.org/debian buster-backports main" >> /etc/apt/sources.list
Then apt update && apt install -t buster-backports wireguard-dkms to install the kernel module. You may need to explicitly load it using modprobe wireguard (this can be verfied via lsmod | grep wireguard); and explicitly loaded every boot by including in the modules to load: echo "wireguard" >> /etc/modules-load.d/modules.conf.
WireGuard Peer Configuration
While WireGuard’s terminology prefers to eschew the traditional ‘client-server’ nomenclature, I find it still helps to think of the relationships in those terms. The ‘server’ here is the container running Pi-hole, and the clients (for now just my phone) will initiate the connection.
‘Server’ Configuration
There are as many guides to configuring WireGuard as there are people running it, it seems. I’ll give a key-redacted indication of what I use here.
Before you start, you’ll need to install the wireguard tools on the ‘server’ end:
# apt install wireguard-tools
You’ll also need to generate a private-public key pair:
$ wg genkey | tee server.key | wg pubkey > server.pub
With these, you can write a configure file for the wireguard interface on the ‘server’ (/etc/wireguard/wg0.conf):
[Interface]
PrivateKey = <'server' private key>
Address = 192.168.2.1/24
ListenPort = 59473
PostUp = iptables -A FORWARD -i wg0 -j ACCEPT; iptables -t nat -A POSTROUTING -o eth0 -j MASQUERADE
PostDown = iptables -D FORWARD -i wg0 -j ACCEPT; iptables -t nat -D POSTROUTING -o eth0 -j MASQUERADE

[Peer]
PublicKey = <phone public key>
AllowedIPs = 192.168.2.11/32
A brief explanation:
- PrivateKey is from
server.key - Address is the address the interface will take. As above, I’ve plonked it in the 192.168.2.x subnet.
- ListenPort is the port to listen on. If your behind NAT, you’ll need to forward this port to the container/node/device.
- PostUp and PostDown include a couple of routing lines for iptables, so that packets get forwarded – this is helpful for browsing the internet from a phone (as in my use case), but if you just want to access local network resources, this can be omitted
- [Peer] configures your first ‘client’
- PublicKey is blank for now
- AllowedIPs is the IP or IP range that is permitted. Here I’ve permitted one IP.
Lastly, you will want to enable IPv4 forwarding by editing /etc/sysctl.conf:
# Uncomment the next line to enable packet forwarding for IPv4
net.ipv4.ip_forward=1
and reload with sudo systemctl daemon-reload
You can then bring up the wireguard interface, wg0, by running as root or with sudo: wg-quick up wg0.
The interface and connection can be inspected by running as root or with sudo simply wg
‘Client’ Configuration
Fist, install WireGuard from the Google Play store or the App Store.
There are a couple of ways of configuring WireGuard on a phone:
- by manually entering the configuration directly on the phone — I did this initially but it’s a bit fiddly to exchange keys
- by configuring it on a PC and scanning a QR code — much quicker but needs an additional program
Phone-based Configuration
Tap the blue plus to create a new interface. Fill in the details in the first section (for the phone, the ‘client’), then ‘Add Peer’.
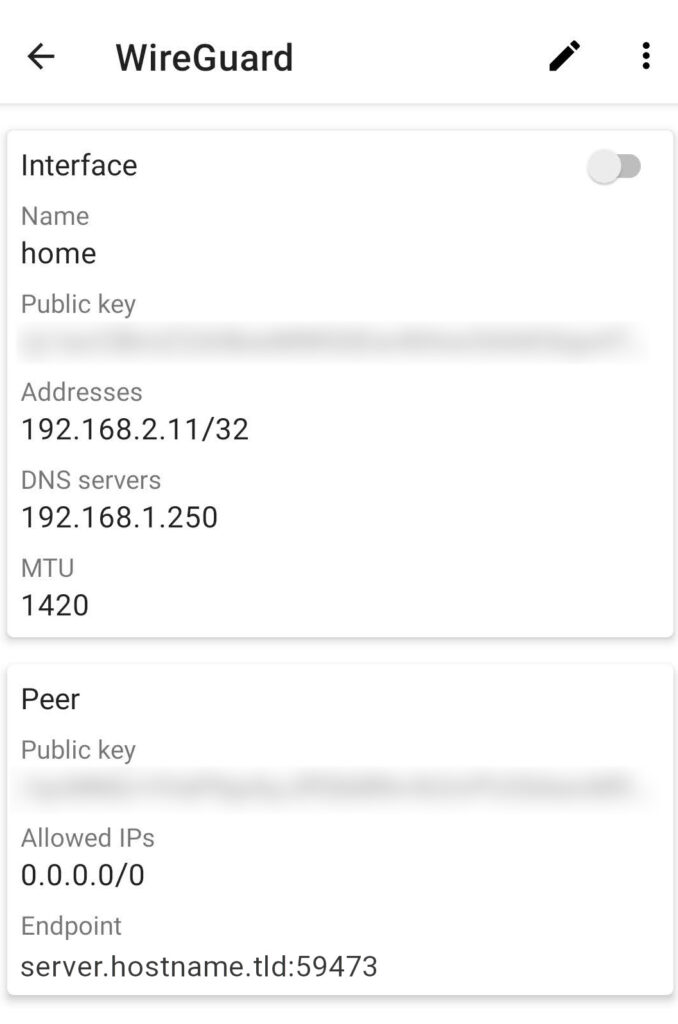
The ‘Interface’ section configures the phone:
- name can be whatever you like
- PublicKey and PrivateKey should be generated on the phone; with PublicKey set in the ‘server’ configuration
- DNS server here is set to the internal IP of the Pi-hole
- MTU can be left blank, but I set this to match the MTU on the server side once I saw what that reported
In the Peer section:
- PublicKey comes from
server.pub, as generated above - Endpoint is the server’s public hostname or address and port
- AllowedIPs of
0.0.0.0/0directs all traffic through the VPN connection
Computer-based Config
Frankly, this is easier than configuring on a phone.
The idea is you write a config file as if it was on the phone, then encode it in a QR code. For this you’ll need the qrencode package, installed via apt install qrencode.
Generate another key pair as before:
$ wg genkey | tee phone.key | wg pubkey > phone.pub
Write a config file as eg phone.conf:
[Interface]
PrivateKey = <phone private key from phone.key>
Address = 192.168.1.12/32
ListenPort = 59473
DNS = 192.168.1.250

[Peer]
PublicKey = <server public key from server.key>
AllowedIPs = 0.0.0.0/0
EndPoint = server.hostname.tld:59473
Then use qrencode to display it as a QR code:
$ qrencode -t ansiutf8 -r phone.conf
This QR code can be scanned from the WireGuard app when you add an interface.
Testing / Verifying the Connection
Once you have the wireguard interface up on the ‘server’ end and connected on the phone end, you should start seeing the rx (receive) and tx (transmit) number increment on the phone.
You can see similar things on the ‘server’ end via wg:
bertieb@pihole:~$ sudo wg
interface: wg0
public key: <redacted>
private key: (hidden)
listening port: 59473
peer: <phone>
endpoint: <phone's ip>
allowed ips: 192.168.2.12/32
latest handshake: 50 seconds ago
transfer: 2.96 KiB received, 10.21 KiB sent
Running a ping to the phone’s IP should increase the ‘rx’ number on the phone’s end and the ‘tx’ number on the server’s end. I also like to use http://checkip.dyndns.org to verify I’m browsing via my home IP.
I did this again, followed my steps and it worked flawlessly. I cycled the wireguard interface (wg-quick down, wg-quick up) after adding the new client config.